Showing posts with label DIY. Show all posts

Tuesday, October 25, 2011

DIY Halloween Costumes.

I feel like girls sometimes get backed into a corner for Halloween costumes. As far as pre-packaged costumes go, they are usually "sexy" Fill in the Blank, that cost nearly $50 and look extremely cheap. I rounded up some great alternatives that are way cuter and cost efficient than anything you can find at Target.

1. Carrie Bradshaw
There are three different ways to go about this. The First Way is in my opinion the most iconic. Every girl knows the opening credits of Sex and the City, where Carrie gets splashed in her Tutu. This outfit would be so easy to put together, all you need is a tutu, pink tank and some stilettos. If you more of a DIY girl check out the tutorial Lauren Conrad featured recently. The second way is to go for the high fashion look, Carrie was never afraid of what she wore. Lastly, the Halston Heritage dress. You could go for the investment and buy the exact dress or you could save on this look alike for around $20 at forever 21.


2. Blair Waldorf (Back in the Constance days)
The key to dressing like Blair Waldorf is colorful and classic. For this look you'll need bright tights and flats, a mini skirt paired with an oxford and blazer. All of these things can be items you already own or items you can use to build your wardrobe. To polish off the outfit add a structured bag and fun headband. 


3. Kate Middleton/Catherine, Duchess of Cambridge
Feel like you were meant to be born or marry into Monarchy? Then channeling everyone's favorite princess may be just the outfit for you! You can go all out with the princess bride look tiara and all. If you're not that flashy go for a toned down look with a royal blue quarter-sleeve dress (similar to the one Kate wore to announce her engagement). J.Crew has a dress that would work great, not only will you be looking like the Duchess herself, but it would also be an investment for your closet. If you are looking to spend a minimal amount of money, wear a shift dress you already own and add a outrageous hat to get the Kate look! Don't forget to wear a large "Sapphire" ring.


Still not satisfied? Head on over to What I Wore. She has been putting together some creative and fun costumes! 


xoxo.


Tuesday, October 18, 2011

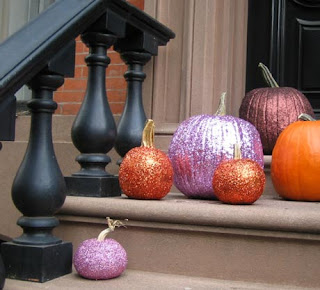
How-To: Sparkle Pumpkins

This weekend I tackled my sparkle pumpkin project and couldn't be happier! I improvised on Martha Stewart's directions.

Materials Needed:
Pumpkins
Krylon's Glitter Blast
Glossy Top Coat
Acrylic Paint (optional)


Directions: 
1. Coat first pumpkin with Glitter 
Let dry then repeat

2. Paint Stem then finish off with Gloss
And Voila! 

Before:


After:


Easy and Painless!

xoxo.

Friday, October 14, 2011

Weekly Blog Roundup

Here are my favorite blogs this week.

One. Dilly Dallas
Dilly Dallas is the blog of creative illustrator Dallas Shaw. Her work has been commissioned by Kate Spade, Ralph Lauren, DKNY, and my fav Jack Rogers.  This is one of my daily must reads.

I'm not going to lie, Refinery is very overwhelming. I didn't know where to start first, so my suggestion is to sign up for their daily email so you can navigate the wealth of fashionista info they contain. 

I first started following The Glitter Guide on tumblr this week, then I fell in love with their regular site. They featured this AWESOME DIY necklace this week.

Four. The Now
I was so excited to find out that the girls that run this blog are from Dallas! I always love to see what other Dallas natives love about our city! 

Lara of simply irresistible has guest bloggers that do city guides, they are so great! She also did a Glitter Pumpkin DIY... (PS the girls from The Now wrote the Dallas city guide!)


xoxo.

p.s. you can follow me on tumblr now! shereaditinablog.tumblr.com

Thursday, October 13, 2011

Wednesday, October 5, 2011

DIY Statement Necklace

I've been itching to do a fun DIY post, but was unsure on what project to do. I settled on this necklace because 1. I have made one before, 2. I have gotten tons of compliments on it, and 3. It's cheap and easy! (please don't judge my grainy iphone pics, I'm having camera difficulties)

What You Need: 
1. Scissors
2. Glass beads (whichever color you prefer)
3. Chain (with my first necklace I made I used an old necklace)
4. Clear bead cord (looks like fishing line)

The Process:
Step One. Cut the cord according to how long you want your loops and how many you want (make sure to leave yourself plenty of extra cord for you to tie onto your chain)
Step Two. String the beads onto the strands of cords 
Step Three. Tie the ends of the cords together
Step Four. Decide where you are going to place each loop of beads then tie them to the chain
Step Five. Trim the excess cord and Viola! 


Don't be afraid to try different variations

Happy crafting! 
xoxo.


Thursday, September 22, 2011

The Never-Ending Project

All last spring and into the summer I searched for the perfect college graduation gift for MG aka my boyfriend.  After much research and consideration, I decided a needlepoint belt was the ticket.  I couldn't just buy any needlepoint belt but one with an Alabama flag (MG loves flag belts and was lacking an Alabama one).

Unfortunately I was not able to find one to purchase, so I decided to make one myself! I though how hard could it be? In reality it's not a simple finish in a weekend project. After scouring the internet for all things needlepoint, I went ahead with my making the belt. I started on it the week before I moved back to college for rush thinking I would finish by September, boy was I wrong. Needlepoint is a simple task that takes a lot of time and patience. MG will probably not have his belt in his hands until after Christmas.

the current state of the belt
up-close dealing of the flag
One of my sweet friend's mom sent me a stack of needlepoint magazines that are waiting to be read on my desk (along with an issue of the National Journal MG left during his last visit)

In the end I would recommend a needlepoint project as a sweet gift as long as you have the patience and time. I also would recommend starting out with something a little less demanding than a belt, more like something along the lines of this. If don't have the time to do the needlepoint yourself, Tucker Blair has some great options as does Smathers and Branson. Contacting your local needlepoint shop is another option. 

p.s. If your in the Dallas area check out Needlepoint This! off Lovers. They ladies are SO nice and will help you with any size project!

xoxo.

Wednesday, September 21, 2011

Hair Pretties

Lately I've been obsessed with these hairbands (but not with that price tag).  I first saw them on lil blue boo, then during rush these hairbands were literally everywhere. I had to get my hands on some, so after some research I decided a DIY project was the best route.  I ordered some fold over elastic aka FOE from a store on etsy.  If you just search FOE, you will find what you need. I used a seller who was geographically close for quicker shipping. I spent about $7 total and got 20 yard then sold the hairbands to my sorority sisters for 3 for $1 and broke even. Each hairband is about 7inches long but can vary depending on the thickness of your hair.
Here are some that I made
Seen in a fishtail braid

I love these hairbands 1. the awesome colors 2. they don't pull my hair out! (some people even say they don't leave creases in your hair, but the jury is still out)

xoxo
ps. don't worry DZs I'm ordering more fabric!